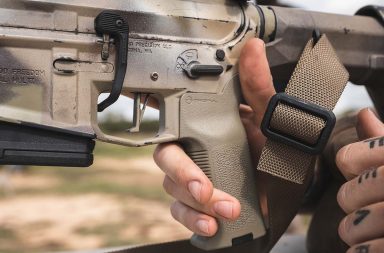
Today, we’ll be taking a closer look at a modular handguard system produced by Ares, released under the Amoeba brand. Ares is really an innovation-driven brand and they constantly release new guns and accessories with unique designs and features.
When it comes to AR frontsets, the market is glutted with various attachment systems like the (standard) MIL-STD-1913 “Picatinny” rail variants, the open source Keymod system, Magpul’s M-Lock and MOE system … you name it. Usually, those handguard systems come with a relatively high price point and aren’t affordable to users that are on a tight(er) budget.
Ares went into developing a somehow unique attachment system for their Modular Handguard series – a system that is easy to mount, fully modular, modern looking and very affordable.
The “Modular Handguard System” is compatible with every AR15 both AEG and GBBR as it can be a replacement for the standard tubular polymer handguard, the standard quad rail or even a replacement for a free-float rail.
Overview

The core component of the MHS (Modular Handguard System) is the polymer handguard itself. The handguard looks quite similar to a Magpul MOE but is by no means just a simple rip-off. While the MHS and the Magpul MOE share asthetics, the only technical detail both systems have in common is how the handguard mounts to the front-sight/handguard cap. That’s about it.

The handguard has quite a slim profile, even it looks a bit bulky at first. The side-panels and the top section are almost a third slimmer than the bottom section. The straight side-panels allow for an easy mounting of flashlight switches for example. Gripping the handguard without any attachments mounted is bit uncomfortable as the interchangeable panels on the bottom create a certain amount of pressure on your palms.

A look inside the handguard. There’s not much space for a battery, you may be able to fit a 2 cell nunchuk LiPo in it if you’re lucky.

This is the front section of the handguard where the handguard cap sits. You can already spot parts of the modular mounting system – the two stainless metal rods. The Amoeba logo is also present on the front section.

Another view of the front section. This is the part that is very similar to the Magpul MOE system.

The bottom of the handguard features various interchangeable pieces and the mounting system for the barrel nut – but more on that later.

This is how the modular handguard looks when disassembled. The handguard mainly consists of four pieces: The upper section, the mounting section, the panels and the rods that hold the panels in place. You can also see how slim the upper section of the handguard really is compared to the panels.

The way the modular panel system works is actually pretty clever and completely tool-less. The bottom panels sit on the body of the handguard an are held in place by two metal rods the reach all the way from the front to the back section. The rods are accessible from the front end of the handguard and can be pulled put by hand. They sit quite tightly in the polymer body and won’t fall out.

A look inside the barrel nut mount.

The Modular Handguard uses a standard AR barrel nut which sits nice and tight inside the handguard.
Installation

I’ll demonstrate the mounting process of the Modular Handguard on an AR15 AEG. This AR is using a free float RIS handguard (PWS MK110 replica) so it needs a seperate front sight and handguard cap. If you’re mounting this on a standard M4A1 model, the front sight and handguard cap are already present.

First we need to remove the front set and the barrel nut, since this is a proprietary barrel nut that we can’t use with the Modular Handguard.

Once the old barrel nut is removed, we’re ready to mount the standard nut using an AR wrench.

Next step is to screw on the new barrel nut by hand …

… and then tighten it down with an AR wrench. You actually don’t need a lot of force to secure the nut so I’, not using an upper vice block for this.

Once the barrel nut is in place, we can mount the handguard.

Mounting the handguard is pretty simple: take the handguard and put it onto the barrel nut. If the handguard isn’t completely leveled, turn the barrel nut a tad and check again.

Once the handguard is nice and leveled out, we can now add the bottom part of the mounting bracket and tighten it down.

The Modular Handguard features to lugs on the left and right side that help stabilizing and prevent it from turning the barrel nut loose. Since the bolt of the dust cover was sticking out too much, I had to trim down of of the lugs in order to mount it.

Not that the handguard is mounted to the barrel nut, we need to add the front sight/gas block and the handguard cap.

All you have to do is slide the handguard cap and the front sight in place and tighten it down. Now this process may vary as there are various mounting methods for the front sight. I’m using an Ares front sight that has a clamping mount rather than a traditional pinned-down front sight. If you have a standard M4A1 frontset, you can skip these steps as your front sight and handguard cap are already in place.

The front sight / gas block that Ares provided is looking very modern and is very easy to install. It also features a small rail on top if you want to add a different front sight.

That’s it. The installation process is very simple and fast – even faster if you use a standard M4 frontset with the iron sights.
Attachments

Now that we’ve installed the handguard itself, it’s time to take a closer look at the available attachments. Colors available are black an tan for all attachments and handguards. Ares offers quite a few different attachments:

Picatinny rail sections: these RIS panels allow you to mount any compatible accessory of your choice. A package includes 4 single panels.

Vertical foregrip: the vertical voregrip features different textures on the body for a secure grip and has a compartment on the bottom. It takes up 2 panel slots.

Angled Foregrip: the angled foregrip is pretty much self-explanatory. it takes up 3 panel slots.

Hand Stop: also pretty much self-explanatory. The hand stop takes up 1 panel slot.

Flashlight / Laser Module: the flashlight / laser module uses 2 CR123 batteries and takes up 3 panel slots plus the front portion of the module replaces the part that holds the handguard cap in place. You can either buy the flashlight or laser module and the heads are also available separately. The module has a two-way switch on the back for momentary-on and constant-on. The flashlight works very well and is quite bright with a medium to wide beam pattern.

45° RIS Panels: these small RIS panels mount to the slots on the upper section of the handguard and allow you to mount flashlights, PEQ boxes or lasers at an 45° angle.

Vertical foregrip attached. Takes up 2 of the 5 slots of the 9 Inch handguard.

Angled foregrip attached. takes up 3 of the 5 slots.

Hand stop atached. Takes up only 1 of the 5 slots.

RIS panels attached. You can attach as many RIS panels as you like or need. Each RIS panel takes up 1 slot.

Flashlight module attached. It takes up 3 of the 5 slots plus the very front panel – comapre with the photo above to see the difference.

Of course you can combine all the panels as long as there are enough free slots. The longer the handguard, the more possibilities you have.

The 45° panels attached. If you plan on mounting these panels, it’s a good idea to take the handguard off the gun as it’s much easier then with the handguard still attached.
Conclusion
At first, I wasn’t really sure if the polymer handguard would be sturdy enough to be a worthy replacement for a rail or even the standard tubular handguard. After mounting the handguard to the gun I was actually quite surprised how strong the frontset was and how little it moved on the outer barrel. The modular attachments are very easy to change and the rod system holds them in place very well. The panels fit tightly and there’s no play between them. I mostly used the vertical and angled foregrip which add a lot of ergonomics to the handguard.
When it comes to the value for money, you almost can’t beat the Amoeba Modular Handguard System. The 7″ version costs around 30USD, the 7″ version 37USD and the 13″ version around 48USD. The attachments are also very affordable too.
 As always, I’d like to thank Ares for letting me test the Modular Handguard System.